Use JMH for your Java applications with Maven

Previously we had an example on using JMH with Gradle for our benchmarks.
Since maven is the most popular build tool for Java it is worth to setup an example.

Let’s add the dependency to our project


    <dependencies>
        <dependency>
            <groupId>org.openjdk.jmh</groupId>
            <artifactId>jmh-core</artifactId>
            <version>1.36</version>
        </dependency>
        <dependency>
            <groupId>org.openjdk.jmh</groupId>
            <artifactId>jmh-generator-annprocess</artifactId>
            <version>1.36</version>
        </dependency>
    </dependencies>

Let’s add a simple benchmark for Array initialization:

import java.util.concurrent.TimeUnit;
import org.openjdk.jmh.annotations.Benchmark;
import org.openjdk.jmh.annotations.BenchmarkMode;
import org.openjdk.jmh.annotations.Mode;
import org.openjdk.jmh.annotations.OutputTimeUnit;
import org.openjdk.jmh.annotations.Scope;
import org.openjdk.jmh.annotations.State;

@State(Scope.Benchmark)
@OutputTimeUnit(TimeUnit.MICROSECONDS)
@BenchmarkMode(Mode.All)
public class ArrayInitializationBenchmark {

  @Benchmark
  public Integer[] initialize() {
    return new Integer[256];
  }

}

We can run the benchmark in various ways. A main class org.openjdk.jmh.Main is provided. This class can be used to pass arguments and execute the benchmarks of interest. So what we can do is to use the maven shade plugin and generate a binary just for the benchmarks.

    <build>
        <plugins>
            <plugin>
                <groupId>org.apache.maven.plugins</groupId>
                <artifactId>maven-shade-plugin</artifactId>
                <version>3.2.0</version>
                <executions>
                    <execution>
                        <phase>package</phase>
                        <goals>
                            <goal>shade</goal>
                        </goals>
                        <configuration>
                            <finalName>jmh-benchmarks</finalName>
                            <transformers>
                                <transformer
                                  implementation="org.apache.maven.plugins.shade.resource.ManifestResourceTransformer">
                                    <mainClass>org.openjdk.jmh.Main</mainClass>
                                </transformer>
                            </transformers>
                        </configuration>
                    </execution>
                </executions>
            </plugin>
        </plugins>
    </build>

By running

mvn clean install

We shall have two jars generated. The jar jmh-benchmarks.jar is the one of interest since it will come configured with the org.openjdk.jmh.Main class.

Running the benchmark is simple

java -jar target/jmh-benchmarks.jar ArrayInitializationBenchmark

It we need more customisations we can also create our own main method and define our benchmarks that we shall pass to the JMH Runner.

package com.gkatzioura.concurrency.benchmark;

import org.openjdk.jmh.runner.Runner;
import org.openjdk.jmh.runner.RunnerException;
import org.openjdk.jmh.runner.options.Options;
import org.openjdk.jmh.runner.options.OptionsBuilder;

public class BenchmarkMain {

  public static void main(String[] args) throws RunnerException {
    Options opt = new OptionsBuilder().include(ArrayInitializationBenchmark.class.getSimpleName()).build();
    new Runner(opt).run();
  }

}

The results will be printed on console

Benchmark                                                     Mode      Cnt     Score   Error   Units
ArrayInitializationBenchmark.initialize                      thrpt       25    10.050 ± 1.045  ops/us
ArrayInitializationBenchmark.initialize                       avgt       25     0.116 ± 0.011   us/op
ArrayInitializationBenchmark.initialize                     sample  8122862     0.147 ± 0.003   us/op
ArrayInitializationBenchmark.initialize:initialize·p0.00    sample                ≈ 0           us/op
ArrayInitializationBenchmark.initialize:initialize·p0.50    sample              0.125           us/op
ArrayInitializationBenchmark.initialize:initialize·p0.90    sample              0.208           us/op
ArrayInitializationBenchmark.initialize:initialize·p0.95    sample              0.250           us/op
ArrayInitializationBenchmark.initialize:initialize·p0.99    sample              0.417           us/op
ArrayInitializationBenchmark.initialize:initialize·p0.999   sample              1.374           us/op
ArrayInitializationBenchmark.initialize:initialize·p0.9999  sample             16.608           us/op
ArrayInitializationBenchmark.initialize:initialize·p1.00    sample           2179.072           us/op
ArrayInitializationBenchmark.initialize                         ss        5     2.992 ± 0.593   us/op

We have all the benchmark modes enabled thus each one of them is listed: Throughput, Average, Single Shot and Sample.
For a more detailed view on the benchmark and the options we have you can check the previous blog on JMH.

That’s it! Happy benchmarking

Dependency management and Maven

Maven is great and mature. There is always a solution on almost everything. The main case you might stumble on organisation projects is dependency management. Instead of each project having it’s own dependencies you want a centralised way to inherit those dependencies.


In those case you declare on the parent prom the managed dependencies. In my example I just want to include the Akka stream dependencies.

<?xml version="1.0" encoding="UTF-8"?>
<project xmlns="http://maven.apache.org/POM/4.0.0" xmlns:xsi="http://www.w3.org/2001/XMLSchema-instance" xsi:schemaLocation="http://maven.apache.org/POM/4.0.0 http://maven.apache.org/xsd/maven-4.0.0.xsd">
	<modelVersion>4.0.0</modelVersion>

	<groupId>org.example</groupId>
	<artifactId>maven-dependency-management</artifactId>
	<packaging>pom</packaging>
	<version>1.0-SNAPSHOT</version>

	<properties>
		<akka.version>2.5.31</akka.version>
		<akka.http.version>10.1.11</akka.http.version>
		<scala.binary.version>2.12</scala.binary.version>
	</properties>

	<modules>
		<module>child-one</module>
	</modules>


	<dependencyManagement>
		<dependencies>
			<dependency>
				<groupId>com.typesafe.akka</groupId>
				<artifactId>akka-stream_2.12</artifactId>
				<version>${akka.version}</version>
			</dependency>
			<dependency>
				<groupId>com.typesafe.akka</groupId>
				<artifactId>akka-http_2.12</artifactId>
				<version>${akka.http.version}</version>
			</dependency>
			<dependency>
				<groupId>com.typesafe.akka</groupId>
				<artifactId>akka-http-spray-json_2.12</artifactId>
				<version>${akka.http.version}</version>
			</dependency>
		</dependencies>
	</dependencyManagement>

</project>

What I use is the dependency management block.

Now the child project would be able to include those libraries without specifying the version. Having the version derived and managed is essential. Many unpleasant surprises can come if a version is incompatible.

Now on to the child module the versions are declared without the version since it is the child module.

<?xml version="1.0" encoding="UTF-8"?>
<project xmlns="http://maven.apache.org/POM/4.0.0" xmlns:xsi="http://www.w3.org/2001/XMLSchema-instance" xsi:schemaLocation="http://maven.apache.org/POM/4.0.0 http://maven.apache.org/xsd/maven-4.0.0.xsd">
	<parent>
		<artifactId>maven-dependency-management</artifactId>
		<groupId>org.example</groupId>
		<version>1.0-SNAPSHOT</version>
	</parent>
	<modelVersion>4.0.0</modelVersion>

	<artifactId>child-one</artifactId>

	<dependencies>
		<dependency>
			<groupId>com.typesafe.akka</groupId>
			<artifactId>akka-stream_2.12</artifactId>
		</dependency>
		<dependency>
			<groupId>com.typesafe.akka</groupId>
			<artifactId>akka-http_2.12</artifactId>
		</dependency>
		<dependency>
			<groupId>com.typesafe.akka</groupId>
			<artifactId>akka-http-spray-json_2.12</artifactId>
		</dependency>
	</dependencies>

</project>

On another note sometimes we want to use another project’s dependency management without that project being our parent. Those are cases where you need to include the dependency management from a parent project when you already have a parent project.

<?xml version="1.0" encoding="UTF-8"?>
<project xmlns="http://maven.apache.org/POM/4.0.0" xmlns:xsi="http://www.w3.org/2001/XMLSchema-instance" xsi:schemaLocation="http://maven.apache.org/POM/4.0.0 http://maven.apache.org/xsd/maven-4.0.0.xsd">

	<modelVersion>4.0.0</modelVersion>

	<groupId>org.example</groupId>
	<artifactId>independent-project</artifactId>
	<version>1.0-SNAPSHOT</version>

	<dependencyManagement>
		<dependencies>
			<dependency>
				<artifactId>maven-dependency-management</artifactId>
				<groupId>org.example</groupId>
				<version>1.0-SNAPSHOT</version>
				<type>pom</type>
				<scope>import</scope>
			</dependency>
		</dependencies>
	</dependencyManagement>

	<dependencies>
		<dependency>
			<groupId>com.typesafe.akka</groupId>
			<artifactId>akka-stream_2.12</artifactId>
		</dependency>
		<dependency>
			<groupId>com.typesafe.akka</groupId>
			<artifactId>akka-http_2.12</artifactId>
		</dependency>
		<dependency>
			<groupId>com.typesafe.akka</groupId>
			<artifactId>akka-http-spray-json_2.12</artifactId>
		</dependency>
	</dependencies>
</project>

As you can see in the block

	<dependencyManagement>
		<dependencies>
			<dependency>
				<artifactId>maven-dependency-management</artifactId>
				<groupId>org.example</groupId>
				<version>1.0-SNAPSHOT</version>
				<type>pom</type>
				<scope>import</scope>
			</dependency>
		</dependencies>
	</dependencyManagement>

We included the dependency management from another project, which can be applied to inherit dependencies from multiple projects.

Spring Boot & Hibernate: Print queries and variables

It’s late in the office and you are stuck with this strange Jpa code with JoinColumns and cascades and you cannot find what goes wrong. You wish there is a way to view the icon-spring-frameworkqueries printed and also the values.
With a little tweaking to your Spring Boot application this is possible.


With the help of lombock heres is our jpa model.

package com.gkatzioura.hibernatelog.dao;

import javax.persistence.Entity;
import javax.persistence.Id;
import javax.persistence.Table;

import lombok.Data;

@Data
@Entity
@Table(name = "application_user")
public class ApplicationUser {

    @Id
    private Long id;

    private String username;

    private String password;

}

It’s repository

package com.gkatzioura.hibernatelog.dao;

import org.springframework.data.repository.CrudRepository;

public interface ApplicationUserRepository extends CrudRepository {
}

A not found exception

package com.gkatzioura.hibernatelog.controller;

import org.springframework.http.HttpStatus;
import org.springframework.web.bind.annotation.ResponseStatus;

@ResponseStatus(value = HttpStatus.NOT_FOUND)
class ApplicationUserNotFoundException extends RuntimeException {

    public ApplicationUserNotFoundException() {
    }

    public ApplicationUserNotFoundException(String message) {
        super(message);
    }

    public ApplicationUserNotFoundException(String message, Throwable cause) {
        super(message, cause);
    }

    public ApplicationUserNotFoundException(Throwable cause) {
        super(cause);
    }

    public ApplicationUserNotFoundException(String message, Throwable cause, boolean enableSuppression, boolean writableStackTrace) {
        super(message, cause, enableSuppression, writableStackTrace);
    }
}

And a controller

package com.gkatzioura.hibernatelog.controller;

import java.util.Optional;

import org.springframework.web.bind.annotation.GetMapping;
import org.springframework.web.bind.annotation.PathVariable;
import org.springframework.web.bind.annotation.ResponseBody;
import org.springframework.web.bind.annotation.RestController;

import com.gkatzioura.hibernatelog.dao.ApplicationUser;
import com.gkatzioura.hibernatelog.dao.ApplicationUserRepository;

@RestController
public class ApplicationUserController {

    private final ApplicationUserRepository applicationUserRepository;

    public ApplicationUserController(ApplicationUserRepository applicationUserRepository) {
        this.applicationUserRepository = applicationUserRepository;
    }

    @GetMapping("/user/{id}")
    @ResponseBody
    public ApplicationUser getApplicationUser(@PathVariable Long id) {
        Optional applicationUser = applicationUserRepository.findById(id);
        if(applicationUser.isPresent()) {
            return applicationUser.get();
        } else {
            throw new ApplicationUserNotFoundException();
        }
    }

}

By adding the following to application.yaml we ensure the creation of the table through hibernate, the logging of the queries, the formatting of the sql queries logged and also the actual parameters values displayed.

spring:
  jpa:
    hibernate:
      ddl-auto: create
    properties:
      hibernate:
        show_sql: true
        use_sql_comments: true
        format_sql: true
logging:
  level:
    org:
      hibernate:
        type: trace

Just

curl http://localhost:8080/user/1

And you got your logs.

Host your maven artifacts on the cloud using CloudStorageMaven

One of the major issues when dealing with large codebases in our teams has to do with artifact sharing and artifact storage.

There are various options out there that provide many features such as jfrog, nexus, archiva etc.

I have been into using them, setting them up and configuring and they certainly provide you with many features. Also having you own repository installation gives you a lot of flexibility. Furthermore docker has made things a lot easier and thus setting them up takes almost no time.

Now if you use a cloud provider like amazon, azure etc there is a more lightweight option and pretty easy to setup. By using a cloud provider such as amazon, azure or google you have cheap and easy access to storage. The storage options that they provide can also be used in order to host your private artifacts or even your public ones.

To do so you need to use a maven wagon which is capable to communicate with the storage options that your cloud provider has and this is exactly what the CloudStorageMaven project deals with.

The CloudStorageMaven project provides you with wagons interacting with Amazon S3, Azure Blob Storage and Google Cloud Storage.

If you already use one of these cloud services hosting your artificats on them seems like a no brainer and theese wagons make it a lot easier to do so.

I have compiled some tutorials on how to get started with each one of them

Happy coding!

Host your maven artifacts using Google Cloud Storage

If you use Google Cloud and you use Java for your projects then Google Cloud Storage is a great place to host your teams artifacts.

It is easy to setup and pretty cheap. Also it is much simpler than setting one of the existing repository options (jfrog, nexus, archiva etc) if you are not particularly interested in their features.

To get started you need to specify a maven wagon which supports google cloud storage.
We will use the Google storage wagon.

Let’s get started by creating a maven project

mvn archetype:generate -DgroupId=com.test.apps -DartifactId=GoogleWagonTest -DarchetypeArtifactId=maven-archetype-quickstart -DinteractiveMode=false

We are going to add a simple service.

package com.test.apps;

public class HelloService {

    public String sayHello() {

        return "Hello";
    }
}

Then we are going to add the maven wagon which will upload and fetch our binaries to the google cloud storage.

    <build>
        <extensions>
            <extension>
                <groupId>com.gkatzioura.maven.cloud</groupId>
                <artifactId>google-storage-wagon</artifactId>
                <version>1.0</version>
            </extension>
        </extensions>
    </build>

Then we shall create the google cloud storage bucket which will host our artifacts.

Our bucket shall be called mavenrepository

Now that we have set up our bucket in google we shall set the distribution management on our maven project.

    <distributionManagement>
        <snapshotRepository>
            <id>my-repo-bucket-snapshot</id>
            <url>gs://mavenrepository/snapshot</url>
        </snapshotRepository>
        <repository>
            <id>my-repo-bucket-release</id>
            <url>gs://mavenrepository/release</url>
        </repository>
    </distributionManagement>

From the maven documentation

Where as the repositories element specifies in the POM the location and manner in which Maven may download remote artifacts for use by the current project, distributionManagement specifies where (and how) this project will get to a remote repository when it is deployed. The repository elements will be used for snapshot distribution if the snapshotRepository is not defined.

The next step is the most crucial and this has to to do with authenticating to google cloud.

You need to have the gcloud command line setup in your system and you must issue a login
‘gcloud auth login –brief’ with an account that has access to the bucket we created previously.
The other way is to use the GOOGLE_APPLICATION_CREDENTIALS environment variable. You can use this GOOGLE_APPLICATION_CREDENTIALS in order to set the path to your google application credentials file.
The credentials file should also be able to access the bucket we created previously.

And now the easiest part which is deploying.

mvn deploy

Now since your artifact has been deployed you can use it in another repo by specifying your repository and your wagon.

    <repositories>
        <repository>
            <id>my-repo-bucket-snapshot</id>
            <url>gs://mavenrepository/snapshot</url>
        </repository>
        <repository>
            <id>my-repo-bucket-release</id>
            <url>gs://mavenrepository/release</url>
        </repository>
    </repositories>

    <build>
        <extensions>
            <extension>
                <groupId>com.gkatzioura.maven.cloud</groupId>
                <artifactId>google-storage-wagon</artifactId>
                <version>1.0</version>
            </extension>
        </extensions>
    </build>

That’s it! Next thing you know, your artifact will be downloaded by maven through google cloud storage and used as a dependency in your new project.

Host your maven artifacts using Amazon s3

If you use amazon Web Services and you use Java for your projects then Amazon S3 is a great place to host your teams artifcats.

It is easy to setup and pretty cheap. Also it is much simpler than setting one of the existing repository options (jfrog, nexus, archiva etc) if you are not particularly interested in their features.

To get started you need to specify a maven wagon which supports s3.
We will use the s3 storage wagon.

Let’s get started by creating a maven project

mvn archetype:generate -DgroupId=com.test.apps -DartifactId=S3WaggonTest -DarchetypeArtifactId=maven-archetype-quickstart -DinteractiveMode=false

We are going to add a simple service.

package com.test.apps;

public class HelloService {

    public String sayHello() {

        return "Hello";
    }
}

Then we are going to add the maven wagon which will upload and fetch our binaries to s3.

    <build>
        <extensions>
            <extension>
                <groupId>com.gkatzioura.maven.cloud</groupId>
                <artifactId>s3-storage-wagon</artifactId>
                <version>1.0</version>
            </extension>
        </extensions>
    </build>

Then we shall create the s3 bucket that will host our artifacts.

aws s3 createbucket artifactbucket.

Now we have create our bucket. Then we shall set the distribution management on our maven project.

    <distributionManagement>
        <snapshotRepository>
            <id>my-repo-bucket-snapshot</id>
            <url>s3://my-test-repo/snapshot</url>
        </snapshotRepository>
        <repository>
            <id>my-repo-bucket-release</id>
            <url>s3://my-test-repo/release</url>
        </repository>
    </distributionManagement>

From the maven documentation

Where as the repositories element specifies in the POM the location and manner in which Maven may download remote artifacts for use by the current project, distributionManagement specifies where (and how) this project will get to a remote repository when it is deployed. The repository elements will be used for snapshot distribution if the snapshotRepository is not defined.

The next step is the most crucial and this has to to do with authenticating to aws.
There easy way is to have aws cli configured to point to the region where your bucket is located and with credentials which have read and write access to the s3 bucket which will host your binaries.

aws configure
AWS Access Key ID [None]: AKIAIOSFODNN7EXAMPLE
AWS Secret Access Key [None]: wJalrXUtnFEMI/K7MDENG/bPxRfiCYEXAMPLEKEY
Default region name [None]: us-west-2
Default output format [None]: json

The other way is to use the maven way and specify our aws credentials on the ~/.m2/settings.xml

  <servers>
    <server>
      <id>my-repo-bucket-snapshot</id>
      <username>EXAMPLEEXAMPLEXAMPLE</username>
      <password>eXampLEkeyEMI/K7EXAMP/bPxRfiCYEXAMPLEKEY</password>
    </server>
    <server>
      <id>my-repo-bucket-release</id>
      <username>EXAMPLEEXAMPLEXAMPLE</username>
      <password>eXampLEkeyEMI/K7EXAMP/bPxRfiCYEXAMPLEKEY</password>
    </server>
  </servers>

Be aware that you have to specify credentials for each repository specified.
Also we are not over yer since It is crucial to specify the region of the bucket.
To do so you you can either set it up the Amazon way therefore specifying it in an environment variable

AWS_DEFAULT_REGION=us-east-1

Or you can pass it as a property while executing the deploy command.

-DAWS_DEFAULT_REGION=us-east-1

And now the easiest part which is deploying.

mvn deploy

Now since your artifact has been deployed you can use it in another repo by specifying your repository and your wagon.

    <repositories>
        <repository>
            <id>my-repo-bucket-snapshot</id>
            <url>s3://my-test-repo/snapshot</url>
        </repository>
        <repository>
            <id>my-repo-bucket-release</id>
            <url>s3://my-test-repo/release</url>
        </repository>
    </repositories>

    <build>
        <extensions>
            <extension>
                <groupId>com.gkatzioura.maven.cloud</groupId>
                <artifactId>s3-storage-wagon</artifactId>
                <version>1.0</version>
            </extension>
        </extensions>
    </build>

That’s it! Next thing you know your artifact will be downloaded by maven through s3 and used as a dependency in your new project.

Host your maven artifacts using Azure Blob Storage

If you use Microsoft Azure and you use Java for your projects then Azure Blob Storage is a great place to host your teams artifcats.

It is easy to setup and pretty cheap. Also it is much simpler than setting one of the existing repository options (jfrog, nexus, archiva etc) if you are not particularly interested in their features.

To get started you need to specify a maven wagon which supports azure blob storage.
We will use the Azure storage wagon.

Let’s get started by creating a maven project

mvn archetype:generate -DgroupId=com.test.apps -DartifactId=AzureWagonTest -DarchetypeArtifactId=maven-archetype-quickstart -DinteractiveMode=false

We are going to add a simple service.

package com.test.apps;

public class HelloService {

    public String sayHello() {

        return "Hello";
    }
}

Then we are going to add the maven wagon which will upload and fetch our binaries to azure blob storage.

    <build>
        <extensions>
            <extension>
                <groupId>com.gkatzioura.maven.cloud</groupId>
                <artifactId>azure-storage-wagon</artifactId>
                <version>1.0</version>
            </extension>
        </extensions>
    </build>

Then we shall create the azure storage account that will host our artifacts.

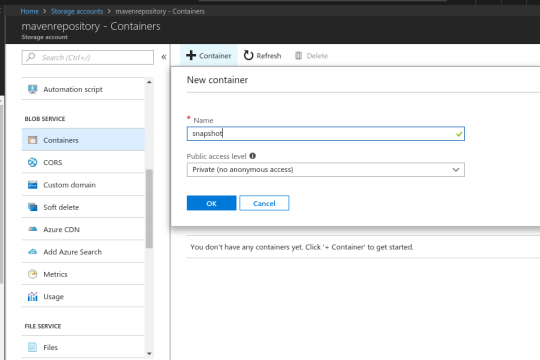
Then we shall create a new container called snapshot. This container will contain our snapshot repositories.

We can go through the same process in order to create a release repository.
Be aware that there is no need to to create different containers for each repository. You can have repositories under the same container.

Now that we have set up our storage account in azure we shall set the distribution management on our maven project.

    <distributionManagement>
        <snapshotRepository>
            <id>my-repo-bucket-snapshot</id>
            <url>bs://mavenrepository/snapshot</url>
        </snapshotRepository>
        <repository>
            <id>my-repo-bucket-release</id>
            <url>bs://mavenrepository/release</url>
        </repository>
    </distributionManagement>

From the maven documentation

Where as the repositories element specifies in the POM the location and manner in which Maven may download remote artifacts for use by the current project, distributionManagement specifies where (and how) this project will get to a remote repository when it is deployed. The repository elements will be used for snapshot distribution if the snapshotRepository is not defined.

The next step is the most crucial and this has to to do with authenticating to azure.

What you need is your storage account name and the key of the storage account.
In order to retrieve both you have to navigate to the Access keys of your Storage Account at the Settings section.

Then we shall specify our storage account credentials on the ~/.m2/settings.xml

  <servers>
    <server>
      <id>my-repo-bucket-snapshot</id>
      <username>mavenrepository</username>
      <password>eXampLEkeyEMI/K7EXAMP/bPxRfiCYEXAMPLEKEY</password>
    </server>
    <server>
      <id>my-repo-bucket-release</id>
      <username>mavenrepository</username>
      <password>eXampLEkeyEMI/K7EXAMP/bPxRfiCYEXAMPLEKEY</password>
    </server>
  </servers>

Be aware that you have to specify credentials for each repository specified.

And now the easiest part which is deploying.

mvn deploy

Now since your artifact has been deployed you can use it in another repo by specifying your repository and your wagon.

    <repositories>
        <repository>
            <id>my-repo-bucket-snapshot</id>
            <url>bs://mavenrepository/snapshot</url>
        </repository>
        <repository>
            <id>my-repo-bucket-release</id>
            <url>bs://mavenrepository/release</url>
        </repository>
    </repositories>

    <build>
        <extensions>
            <extension>
                <groupId>com.gkatzioura.maven.cloud</groupId>
                <artifactId>azure-storage-wagon</artifactId>
                <version>1.0</version>
            </extension>
        </extensions>
    </build>

That’s it! Next thing you know your artifact will be downloaded by maven through azure blob storage and used as a dependency in your new project.

Integration tests with maven

Implementing unit tests with maven is something ordinary and most of us are familiar with the project structure and where the unit tests reside.

However Integration tests are a different case and most of times they have pretty different requirements.
For example it is ok to have your unit tests operate on a h2 in memory database but when it comes to integration tests and complex queries, it is best for them to be executed against an actual relational database like the one used in production.

Considering the above example, chances are that our integration tests might have different configurations and dependencies.

So our goals for our integration tests is to keep them separate from other tests and to execute them separately.

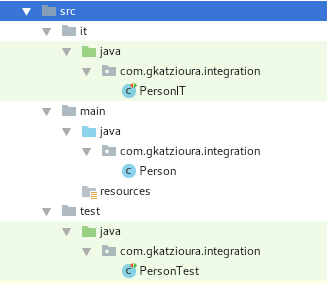
Regarding our maven structure within the source directory we have the main ‘folder’ and test ‘folder’.

In the same fashion we will add an extra directory called ‘it’.
The ‘it’ directory will contain a java directory for our java sources and a resources directory. Same structure with the test directory.

Then we should give instruction to maven on building our code and adding it to our test sources.

                <plugin>
                    <groupId>org.codehaus.mojo</groupId>
                    <artifactId>build-helper-maven-plugin</artifactId>
                    <version>1.5</version>
                    <executions>
                        <execution>
                            <id>add-test-source</id>
                            <phase>process-resources</phase>
                            <goals>
                                <goal>add-test-source</goal>
                            </goals>
                            <configuration>
                                <sources>
                                    <source>src/it/java</source>
                                </sources>
                            </configuration>
                        </execution>
                    </executions>
                </plugin>

By using the build helper maven plugin we can instruct maven to add extra test source directories to our our build.

The next step is to instruct maven to run our unit tests. To do so we will use the maven failsafe plugin.

The Failsafe Plugin is designed to run integration tests while the Surefire Plugin is designed to run unit tests. The name (failsafe) was chosen both because it is a synonym of surefire and because it implies that when it fails, it does so in a safe way.

            <plugin>
                <groupId>org.apache.maven.plugins</groupId>
                <artifactId>maven-failsafe-plugin</artifactId>
                <version>2.15</version>
                <executions>
                    <execution>
                        <id>integration-test</id>
                        <goals>
                            <goal>integration-test</goal>
                        </goals>
                    </execution>
                    <execution>
                        <id>verify</id>
                        <goals>
                            <goal>verify</goal>
                        </goals>
                    </execution>
                </executions>
            </plugin>

Then to execute the integration tests we should issue.

mvn verify

As expected our integration tests run separately.

To sum up, we want to have integration tests separated from our unit tests. Also we want them to run separately. This can be achieved by utilizing the maven failsafe plugin.
You can find an example project on github.